Note: I simplified this a fair bit by pushing streams directly to a restreamer server I setup locally, which then sends to wherever I want. I’ll write about that alone soon.
[DEPRACATED – I just left this here for historic purposes]
I have been asked how I setup live streams for the occasional family videos, hurricane videos and such.
Here I will describe a few basic ideas on streaming and how I then setup a mixed-streaming environment. Mixed meaning that possibly many videos are combined into one, and then this one video is distributed to many endpoints, such as Facebook, Youtube and Twitch.
But before getting into all the details of the software and configurations a basic concept that starts with the video source needs to be discussed, and that is PUSH versus PULL.
PUSH Sources
It sounds simple enough but the source of a video feed can be categorized as either a PUSH source or a PULL source. Essentially a PUSH source has the logic to send the video somewhere else. You tell it the destination and it will then try to push the stream to that destination. An example of such a device is a GoPro camera. In the GoPro settings you tell its RTMP setup where to PUSH the video. You cannot open a web page on the GoPro and find a link to pull the video to you since it is not a video server. Instead it is better thought of as a video client that pushes the video somewhere else.
PULL Sources
A PULL source works the other way. Instead of telling the source where to send the video, it instead makes a URL available to PULL the video from the source. Examples of these type of devices are many security cameras or web cameras on the Internet that display traffic data or people frolicking on beaches. Think of a PULL source as having a server that is able to serve its content to multiple clients.
Here is an example of a PULL source showing a live feed of the highway near me. It has a URL of
[srs_player url=”https://43-mdx-cfx.divas.cloud/CHAN-6899/CHAN-6899_1.stream/playlist.m3u8″ width=”480″]
A side effect of a PULL service is that it can support many connections at the same time (up to a limit) and as such can share its video with multiple destinations.
Software I use to make it happen
There are numerous software applications that can be used to merge all the videos together, do something cool with them, and then turn around and send the results to YouTube or some other destination. Some solutions are expensive. Some insert watermarks. Some have bandwidth limitations. In short, there is no perfect solution for everyone and in typical Internet fashion, any hint of suggesting my ideas are better than someone else’s is a recipe for creating angst, anger and a hefty portion of troll bait.
So instead here is what I use and why.
-
- For combining video streams: Open Broadcast Software (OBS)
 . OBS is open source and can take multiple PULL video sources or local files and combine them together in a scene (the layout, size and positions of each source) and then PUSH the result somewhere else. OBS then acts as a PUSH source and sends the final video elsewhere. However OBS cannot input a video stream from a PUSH source (like a GoPro) without some help.
- For combining video streams: Open Broadcast Software (OBS)
-
- For helping OBS handle PUSH sources: nginx
 with its RTMP module. The open source nginx web server in this configuration can receive video from a PUSH source, like a GoPro camera, and redistribute it as a PULL source which allows OBS to PULL the video. The nginx component acts as a PUSH-PULL translator.
- For helping OBS handle PUSH sources: nginx
- For sending the OBS output to multiple destinations: Restreamer
 . Restreamer receives video from a PUSH source (such as OBS) and then in turn PUSHES the video to multiple destinations such as YouTube and Facebook.
If the only need though is to push a single source to multiple destinations, such as a GoPro live stream source, then OBS and nginx are not needed. As well, if all that is required is pushing a single source to a single destination, such as Facebook, then none of OBS, nginx or Restreamer are needed – the connection goes directly from the GoPro to the final destination, such as Facebook.
Also be aware that combining all these components is fraught with peril. At any moment any or all of the components can go poof and the whole setup falls flat on its face and stops working. As such it is highly recommended to practice, practice and then once done, practice some more using these software components and making a determined effort to understand how each works. Explaining the usage, configurations and issues with each of OBS, Restreamer and nginx is sadly beyond the scope of this introduction, but learning all about them will happily keep someone occupied for a fair bit of time.
What can OBS be used for?
With OBS the sky’s the limit. Imagination and creativity control what OBS can be used for.
A simple example I have used in the past is to combine the video feed from my camera with the audio input on my laptop. That way I did not have to sit outside in the rainy dark and add commentary to what was happening. I could sit nice and warm inside and talk about what the camera was recording.
Other items it can be used for include combining a weather feed with a live camera feed, or sitting in front of a camera with a chroma key filter (think Green Screen) and merge a video of walking through a theme park as background. The latter can often be amusing when used as a video conferencing camera…..
But if combining sources is not part of the project, skip over OBS.
How I Setup The Software
This is the part that is not for the faint of heart. If any of the previous information was confusing then it is likely just going to go downhill from here…..
It is possible to run all of the software on one system just as it is possible to run some on one system and some on another.
In addition software such as nginx and restreamer can be run natively on most systems or configured to run as a docker container on a host system.
In my case I have numerous Ubuntu servers and both Macs and a Windows PCs handy. On one Ubuntu server I run restreamer using a docker container whereas nginx runs natively. For OBS I run it either on my Mac or my Windows PC depending upon where in the house I am doing my work.
This setup allows my GoPro to PUSH to the nginx server, which then allows OBS on my laptop to pull the video stream, which then in turn PUSHES back to the Restreamer server and then ultimately to the external destinations.

In summary,
- nginx with RTMP module running on Ubuntu server
- OBS running on laptop
- Restreamer running on Ubuntu server within a docker container
nginx could also be run within a docker container, and docker is available for Mac, Windows and Linux allowing all of the above to be run on one system if desired.
Example nginx config
First nginx needs to be installed and setup. There are plenty of tutorials across the web so pick one that best suits how you want to do it, docker, native, Windows, Mac, Linux, etc., and have at it.
Don’t get hung up on anything related to SSL since this will be an internal only server.
Next, make sure the nginx RTMP module is installed. On Ubuntu this os done using
apt install libnginx-mod-rtmp
Once installed the next step is to edit the nginx.conf file (/etc/nginx/nginx.conf on Ubuntu) and add the rtmp section:
# This block of code tells NGINX to act as an RTMP server.
rtmp {
    server {
        # Sets the port the server will listen on.
        listen 1935;

        # The size of each chunk of data that will be sent.
        chunk_size 4096;

        # Defines a named application called "live" that OBS can connect to
        application live {
            # Tells NGINX to enable live streams for your users.
            live on;

            # This line tells NGINX to disable recording. If this line is not included,
            # NGINX will keep recording and save your stream forever to your disk.
            record off;

            # Let anyone publish a video stream since this is an internal only server
            # Do Not Do This if your nginx server is accessible from the Internet
            allow publish all;

            # Let anyone play
            allow play all;

        }
    }
}
With this config added to the end of the nginx.conf file the nginx server should be all set to receive content from the GoPro.
The URL used to send the data will be something like: rtmp://192.16.0.254/live but using the IP address of your server instead.
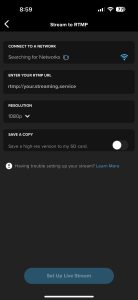
GoPro config to push to nginx
Although a GoPro works, it is often not my first choice. I find GoPros are subject to overheat and crash at the most inopportune times. Plus when streaming it is best to use an external power source which compromises the GoPro’s weatherproofing. As well, to setup properly GoPros require that all of the stream configuration is done using the GoPro application on a smartphone. This then ties up the smartphone to control the stream, so it is a good idea to have a charger handy to keep it going…..
In the GoPro application setup a live stream.
- Select the option for an rtmp server under Live Stream, which will be the nginx system setup earlier
- Enter the URL as rtmp://[nginx IP address or hostname]/live
- Select an output resolution such as 1080p if on a fast network
- Likely turn off saving to a local SD card as this will fill up pretty fast. Besides, if it is desired to make a copy, change the nginx config to “record on” and check out the other record parameters needed to save the output
- Start the streaming 🙂
If all went well then the GoPro should be streaming to nginx. You can verify it is working by using a video player such as VLC and opening the network location of rtmp://[nginx ip address or hostname]/live, press play and the stream should appear.
If anything goes wrong, I find fixing the GoPro setup often requires completely removing its battery and unplugging it from any power source. Simply restarting just does not seem to reset eveything.
OBS config to PULL from nginx
Leave the GoPro streaming. It makes the next step easier since you will be able to see the stream in OBS and use that to move and resize it.
Head over to the laptop of desktop system and fire up OBS.
Create a scene (a place to hold all the stuff) and within the scene add a Media Source to the source section.
It should open a popup configuration window.
Turn off local file as the input and the dialog box should change to allow entry of the URL into the input box.
Enter rtmp://[ip address of your nginx system or hostname]/live
If all goes well then an overlay of the GoPro stream should appear inside the scene allowing you to resize and position it.
At this time if you wish to add other items, like background pictures, other video streams, audio inputs and such, feel free to do so.
As a hint – turn off any audio that you do not want in the audio mixer, such as the local laptop microphone…..
Also if interested in different scenes such as an introduction scene with premade videos, or a closing scene with credits, creating more scenes and then switching between them as needed allows for displaying these different type of layouts. Playing with all these features is a step toward building a professional looking broadcast system….
Restreamer config to receive PUSH from OBS
I found the simplest way to run Restreamer was by using its docker container. There is a snappy video on their website on setting up Restreamer using docker.
Once setup and you can access Restreamer on your local network, visit. https://[IP address of your system running docker]:[port number]/ui and log in.
After the default access challenge, you should be viewing the Restreamer page.
There are many videos on YouTube that show how to setup various parts of Restreamer, but what is relevant now is to create a channel and add an RTMP configuration. A Youtube video shows how to configure RTMP.
Once done, click on the RTMP button underneath the channel (where it show HLS, RTMP and Snapshot) and the RTMP URL should be copied to the clipboard. Go to OBS and using the Settings button under the Controls section, paste this URL as the server value under the Stream section. Save this and select Start Streaming under the control box.
Restreamer should now be receiving the PUSHED OBS video in its channel view. If it does, congratulate yourself and grab an appropriate adult beverage to celebrate. If not, cry and delve into the world of Restreamer watching more videos to see if it is obvious what went wrong…..
Restreamer PUSH to final destination
At this point all that is eft is to tell Restreamer to send the video somewhere else. These are called “Publications”.
By default a player publication may be availble which gives a URL to access the stream. If it is available it can be clicked on and then copy the URL that is displayed and try pasting into a new tab. A default web player should be displayed that can be played to see the final Restreamer output.
Now it is time to add more publication endpoints. Click on the + in the Publications and add as many endpoints as you wish, noting that each will use some of your bandwidth so avoid configuring too many endpoints and lagging your video out of existence:-)
Enjoy!